 Inserting speaker arrays
|
Mode |
Tool |
Tool set |
|
Modes for The Symbol Insertion tool |
Speaker Array
|
Event Design |

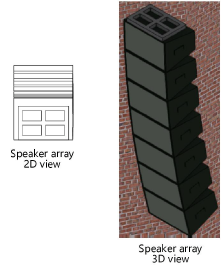
Large venues require the use of speaker arrays, which consist of speakers stacked in a column and topped by a bumper (top mounting bracket). Up to three different types of speakers can be included in an array. The speakers can each be tilted differently to provide maximum audio coverage for the audience.
To insert a speaker array:
Click the tool and the insertion modes.
Click to place the object in the drawing, and click again to set the rotation.
The first time you use the tool in a file, a properties dialog box opens. Set the default parameters.
The speaker array properties can be edited later from the Object Info palette. To edit the array, select the bumper. Individual speakers can be selected and certain parameters can be set independently, but since the speakers are controlled by the array, many of their parameters are not available (see Inserting speakers for parameter descriptions).
Click to show/hide the parameters.Click to show/hide the parameters.
|
Parameter |
Description |
|
Array Details |
|
|
Column ID |
Specifies a name for the bumper-speaker combination that makes up the array |
|
Location |
Indicates the array location (such as Downstage Right) |
|
Purpose |
Indicates the purpose of the array (such as Center Fill) |
|
Note |
Enter miscellaneous notes such as rental source or stock number |
|
Configure Array |
Opens the Array Detail and Configuration dialog box, to view and edit speaker array parameters |
|
Current Types |
Lists the bumpers and speakers that make up the array, along with speaker counts |
|
Total Weight (Object Info palette only) |
Displays the total weight of all the array components, including the bumper; click Populate Array if not displayed |
|
Support |
Displays the support type |
|
Bottom Element Trim (Object Info palette only) |
Displays the vertical trim of the bottom unit; click Populate Array if not displayed |
|
Listening Height |
Sets the listening height reference for the speakers’ dispersion lines. Listening height must be less than any speaker’s elevation (Z value). |
|
Override A/B/C dispersion (V) with array angles |
Calculates the dispersion based on the array’s Angle Relative to Preceding value for each speaker set on the Array tab, rather than the individual speaker’s vertical dispersion angles |
|
Show dispersion for range 1/2/3 |
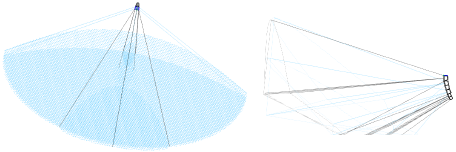
Draws the top, bottom, left, and right dispersion lines for each of the three dispersion ranges selected for display, for each speaker (or the Overall range if expanded dispersion is not selected). When applicable, a center reference line is drawn for each of the three dispersion ranges, for each of the speaker models in the array. An outline or hatch pattern representing the listening area coverage “shadow” is drawn when the throw distance and the vertical dispersion and tilt angles allow the speaker to cover the area at or below the Listening Height.
|
|
Show dispersion hatch |
Displays hatch fills in the coverage shadow of each enabled dispersion range |
|
Show rigging guides |
Displays the guides which indicate the approximate location of the motors on the bumper |
|
Hanging Support |
Before attaching hoists to the bumper, select whether to hang the array by one, two, or multiple hoists. For one hoist, the hanging point of the load is generated in the center of the speaker array. For two hoists, a rigid beam is generated in the vertical middle of the bumper, and all support objects connect to this beam. Snap points indicate where the two hoists can be attached. For multiple hoists, the entire bumper is a rigid structure, and all support objects can be connected to this structure. Snap points indicate where a minimum of three hoists can be attached. |
|
Populate Array (Object Info palette only) |
The first time the speaker array is created, click Populate Array after exiting the Array Detail and Configuration dialog box, to add the bumpers and speakers to the array |
|
Text Options |
Opens the Text Options dialog box, to enable the display and format the text of labels; see Formatting speaker object labels |
|
Default Text Position (Object Info palette only) |
Restores text labels to their default positions |
|
Opens the Classes dialog box, to specify class naming for the various portions of the speaker array. This allows portions of the cabinets, grills, and other elements to be set to visible, grayed, or invisible. Different textures can be applied to the different part classes, for a highly realistic appearance. Use the standard class, select a class from the list of classes present in the drawing, or create a new class. Select <Speaker Array Class> to place the speaker element in the same class as the speaker array. Class Prefix: Specifies an optional default root class naming standard for all speaker array parts; click Assign Default Classes With Prefix to begin all speaker array class names with the prefix, so that they are sorted together. Assign Default Classes With Prefix: Sets the class names for all speaker array elements to the standard, using the Class Prefix if there is one. Speaker array elements: For each portion of the speaker array, specifies the class name standard; the class names shown here are applied to the elements. |
|
|
Update (Object Info palette only) |
Updates the object when changes have been made to the Object Info palette parameters. Speaker and bumper alignment is adjusted if necessary, and the dispersion ranges and hatch are refreshed. |
|
Load Information |
A speaker array is considered a point load in Braceworks calculations; if the insertion point is on a rigging object, it is considered to be a load on that structure. Load information is used for Braceworks calculations and reports (Braceworks required). |
|
Include in Calculations (Braceworks required) |
Includes the speaker array in Braceworks calculations; deselect to exclude it from participating in structural calculations |
|
Load Group Name |
The load category is always Audio for speaker array objects |
|
Load ID |
Enter a unique ID for the load for informational use in reports |
|
Load Name |
Identifies the object in load calculations |
|
Total Weight |
Enter the total weight of the bumper |
|
Position |
Displays the name of the associated rigging object, if the speaker array is attached. Optionally, attach this object to a rigging object, or change the rigging object association, by entering the Position Name of the rigging object. Delete the name to break the association. For other methods to attach loads, see Making the attachment. |
A bumper is inserted. From the Object Info palette, click Configure Array.
The Array Detail and Configuration dialog box opens. Specify the bumper parameters on the Bumper tab.
Click to show/hide the parameters.Click to show/hide the parameters.
|
Parameter |
Description |
|
Definition |
|
|
Source |
Select whether the bumper is a symbol from the resource library or an item from the catalog. Symbol resources include preset data and detailed geometry for visualization in plan views, but respond more slowly to edits such as rotating the object. Catalog resources include preset data and a basic box of the correct size to respond quickly and efficiently to edits such as rotating the object. When a symbol resource is inserted, most parameters are populated from the symbol and disabled. |
|
If Source is set to Catalog, select a bumper from the default bumper data available in the library file; alternatively, select <Generic> to create a bumper with custom data and then save the bumper as a custom bumper in the library file. Select Import to import predefined bumper data only (such as width and weight) from a library or another file containing bumpers. The Import Bumper Type dialog box opens to select the file and type. A symbol is not imported from the file; only data is added. |
|
|
Select Symbol |
If Source is set to Symbol, click to select a symbol from the Resource Selector |
|
Brand |
Specifies the bumper manufacturer |
|
Model |
Specifies the manufacturer’s information |
|
Save Type to Catalog |
Saves the current bumper configuration as a new bumper type; enter the name of the bumper type. This custom bumper can then be selected from the Type list. |
|
Delete Type from Catalog |
Removes the bumper configuration currently selected in Type from the catalog; the current parameters remain as set, and the type becomes <Generic> |
|
Attributes |
|
|
Structure |
Select whether to use a Frame or T type structure |
|
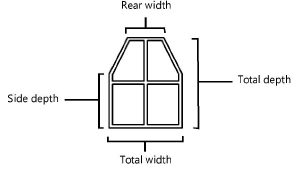
Overall Width |
Indicates the width of the entire bumper |
|
Rear Width |
Sets the width of the bumper at the back of the bumper |
|
Overall Depth |
Specifies the total depth of the bumper |
|
Side Depth |
Sets the depth of the bumper at the side |
|
Thickness |
Specifies the thickness of the bumper |
|
Hardware Width |
Sets the width of the bumper hardware (brackets) |
|
Weight |
Specifies the bumper weight |
|
Extension Bar(s) |
When extension bar or bars are present on the bumper to assist with balance and focus of the speaker array, select Center for one in the center, or Sides for bars on each side of the bumper |
|
Length/Height/ Width |
Specifies the dimensions of the extension bar or bars |
|
Weight |
Specifies the weight of the extension bar or bars |
|
Front Shift |
Enter the distance that the bar or bars extend from the bumper; a negative number extends the bars towards the front of the bumper |
|
Side Inset |
For side extension bars, specifies the distance to inset the bars on each side |
|
Show rigging guides |
Indicates the approximate placement of motors; the number and location of rigging guides depends on the presence of extension bars |
|
Front Inset |
Sets the inset distance of the guides from the front of the bumper |
|
Side Inset |
When there are no extension bars, sets the inset distance of the side rigging guides |
|
Rear Offset |
Sets the inset distance of the guides from the rear of the bumper |
|
Preview |
Displays a preview of the bumper, which updates as parameters change; the arrow indicates the front face |
|
Rendering Mode |
Select the rendering mode for the preview |
On the Speaker A, B, and C tabs, configure up to three types of speakers for inclusion in the array.
Click to show/hide the parameters.Click to show/hide the parameters.
|
Parameter |
Description |
|
Definition |
|
|
Source |
Select whether the speaker is a symbol from the resource library or an item from the catalog. Symbol resources include preset data and detailed geometry for visualization in plan views, but respond more slowly to edits such as rotating the object. Catalog resources include preset data and a basic box of the correct size to respond quickly and efficiently to edits such as rotating the object. When a symbol resource is inserted, most parameters are populated from the symbol and disabled. |
|
If Source is set to Catalog, select a speaker from the default speaker data available in the library file; alternatively, select <Generic> to create a speaker with custom data and then save the speaker as a custom speaker in the library file. Select Import to import predefined speaker data only (such as width and weight) from a library or another file containing speakers. The Import Speaker Type dialog box opens to select the file and type. A symbol is not imported from the file; only data is added |
|
|
Select Symbol |
If Source is set to Symbol, click to select a symbol from the Resource Selector |
|
Brand |
Specifies the speaker manufacturer |
|
Model |
Specifies the manufacturer’s information |
|
Save Type to Catalog |
Saves the current speaker configuration as a new speaker type; enter the name of the speaker type. This custom speaker can then be selected from the Type list. |
|
Delete Type from Catalog |
Removes the speaker currently selected in Type from the catalog; the current parameters remain as set, and the type becomes <Generic> |
|
Attributes |
|
|
Front Width/Height |
Indicates the width and height of the front face of the speaker |
|
Back Width/Height |
Indicates the width and height of the back face of the speaker; the back face cannot be larger than the front face |
|
Depth |
Specifies the speaker depth |
|
Flip orientation |
Rotates the speaker 90° to place the speaker on its side |
|
Tilt Reference |
For speakers in an array, sets the reference for tilting the speaker to either the front or back face |
|
Weight |
Indicates the weight of the speaker |
|
Self-powered |
Indicates whether the speaker uses an internal or remote amplifier |
|
Minimum Wattage |
Enter the minimum required wattage to operate the speaker, for power consumption calculations and reporting |
|
RMS Wattage |
Specifies the average power applied to the speaker |
|
Peak Wattage |
Indicates the maximum power that can be applied to the speaker |
|
Impedance (ohms) |
Specifies the speaker’s impedance |
|
Dispersion(s) |
|
|
Override vertical dispersion(s) with array angles |
Calculates the dispersion based on the array’s Angle Relative to Preceding value for each speaker set on the Array tab, rather than the individual speaker’s vertical dispersion angles |
|
Asymmetrical horizontal dispersion(s) |
Allows asymmetrical coverage to be defined, with different left and right dispersion angles |
|
Expanded dispersion |
When selected, allows you to enter range notes and dispersion area information for up to three ranges; deselect to enter only Overall information |
|
Range 1/2/3 |
Enter notes for three dispersion ranges, such as a frequency range, key frequency, or crossover point. When Expanded Dispersion is deselected, the range is automatically set to Overall and only one set of values can be entered. |
|
Horiz. Dispersion Full |
When dispersion is symmetrical, enter the horizontal dispersion angle, from 0 to 180°; for asymmetrical dispersions, the total dispersion (left + right) is displayed |
|
Horiz. Dispersion Left |
When dispersion is asymmetrical, enter the left dispersion angle, from 0 to 90° |
|
Horiz. Dispersion Right |
When dispersion is asymmetrical, enter the right dispersion angle, from 0 to 90° |
|
Vert. Dispersion |
Enter the vertical dispersion angle, from 0 to 180° |
|
Throw Distance |
Sets the throw distance reference for the dispersion lines |
|
Preview |
Displays a preview of the speaker, which updates as parameters change; the arrow indicates the front face |
|
Rendering Mode |
Select the rendering mode for the preview |
Set up the array configuration on the Array tab.
Click to show/hide the parameters.Click to show/hide the parameters.
|
Parameter |
Description |
|
Array Support |
Specify how the speaker array is supported: Flown-Motors, Flown-Crank Lift, Ground-Stacked, Tripod, or Sub Pole. Flown arrays place the speakers below the bumper. Ground-stacked arrays are inserted above the bumper. Arrays supported by a tripod or a sub pole do not include a bumper. |
|
Bumper Type |
Displays the bumper type that is selected on the Bumper tab (does not apply to tripod-supported arrays) |
|
Bumper Angle |
Sets the angle of the bumper, establishing a starting angle for the top mounting (does not apply to tripod-supported arrays) |
|
First Speaker Shift |
Controls the offset of the speaker stack from the bumper. Enter a positive value to shift the speaker stack towards the rear of the bumper; enter a negative value to offset the speaker stack towards the front of the bumper. |
|
Tripod/Pole Height |
For tripod- and sub pole-supported arrays, specifies the height at the top of the support |
|
Tripod Angle |
Specifies the rotation angle of the tripod |
|
Ground Speaker Count |
For sub pole-supported arrays, specifies the number of ground speakers before the sub pole is inserted |
|
Definition |
Lists the speakers that make up the array and their relative and actual dispersion angles, in order from top to bottom starting from below the bumper. Add speakers to the list by selecting one or more from the Bumper and Speaker Types to Add list, and then clicking Add/Swap Bumper(s) or Speaker(s). To re-order the speakers, click the # column of the speaker to be moved, and drag it up or down the list. A horizontal line indicates where the speaker will be inserted in the current order. |
|
Bumper and Speaker Types to Add |
Lists the bumper and speaker(s) defined on the Bumper and Speaker tabs. The bumper and speakers in this list are available for placement in the array. |
|
Add/Swap Bumper(s) or Speaker(s) |
Adds one or more selected bumper or speakers to the array; to swap one or more units, select the unit or units to be replaced in the definition list first. To add speakers without swapping, ensure that no speakers are highlighted in the definition list. |
|
Delete Bumper(s) or Speaker(s) |
Deletes the bumpers or speakers selected in the definition list |
|
Bumper and Speaker Counts |
Lists the number of each type of bumper and speaker, as well as the total number of speakers, included in the array |
|
Angle Relative to Preceding |
Sets the angle of the speaker selected in the definition list. Individual speakers have range dispersion angle settings, but these can be overridden to use this angle set for the array instead. The Rel° and Act° angles in the definition list update to reflect the current speaker angles. |
|
Rack |
Enter notes about the rack driving the speaker (this can only be accessed when accessing the speaker settings from the Object Info palette of a selected speaker array) |
|
Amplifier |
Specifies the selected speaker’s amplifier |
|
Drive Line |
Indicates information about the drive line feeding signal to the speaker (this can only be accessed when accessing the speaker settings from the Object Info palette of a selected speaker array) |
|
Cable |
Indicates the cable used for the selected speaker |
|
Note |
Enter notes about the selected speaker |
|
Preview |
Displays a preview of the speaker array, which updates as parameters change; the arrows indicate the front face |
|
Rendering Mode |
Select the rendering mode for the preview |
From the Object Info palette, click Populate Array to add the speakers to the drawing.
